
If you use your record player for a decent time, the needle on your cartridge will eventually wear down, and you’ll need to replace it with another one.
However, to ensure that your music plays properly, you’ll need to know how to align the turntable cartridge, and that’s where this guide comes in handy!
To align a turntable cartridge, you’ll need to place the tip of the stylus on the first grid of the alignment protractor, adjust the horizontal alignment, then transfer the tonearm to the next grid in order to line it up vertically before screwing it tightly.
In this guide, we’ll walk you through a brief guide that shows you how to align your turntable cartridge properly to enjoy your music without distortion. So without further ado, let’s dive right in!
Why Is It Necessary to Align Turntable Cartridges Before Use?
Keeping the alignment of the cartridge’s needle is extremely essential for the quality of the music played by the turntable.
Keeping the stylus tip aligned so that it remains always tangent to the grooves of the record you’re playing allows the needle to accurately track all the elements of the music without misses.
On the other hand, if you don’t align the stylus tip (the needle) properly, you will easily notice the distortion in the music quality and how the record should sound.
Additionally, since the record isn’t aligned tangent to the record grooves, it is going to skip the tunes more often.
Misalignment can also cause other long-term problems to the stylus, as it’ll start to wear down quicker because the pressure isn’t applied exactly at the tip, so you’ll have to replace it earlier.
Since they’re made of diamonds, a stylus can end up costing you a lot of money, especially if you prefer high end cartridges!
How to Properly Align the Turntable Cartridge
Aligning and adjusting the stylus can be slightly tricky, especially if you’re a beginner. However, with time and practice, aligning your stylus should eventually work out just fine.
In this section, we’ll walk you through the entire process of properly aligning your cartridge stylus, so you can enjoy undistorted music playback!
Step 1: Print or Buy a Cartridge Alignment Protractor
The first thing you need to do in order to properly align your turntable cartridge is to get a proper cartridge alignment protractor.
This one is a simple printable grid that you use as a reference or a template to guide you while aligning the needle tip of the cartridge by showing you the lines of tangency. Although many turntables come with one, you can still work it out if yours didn’t come with one.
There are plenty of alignment protractors out there, such as this Turntable Lab Protractor that is made of plastic and has a pre-drilled hole to properly place it on the turntable spindle.
Alternatively, you can simply print the alignment protractor on a sheet of paper and use it as a template.
Here’s a PDF template from Fluance that you can download and use, but make sure that you print it to the original scale and check it by the reference scale provided in the PDF.
Must read: How To Clean Turntable Cartridge
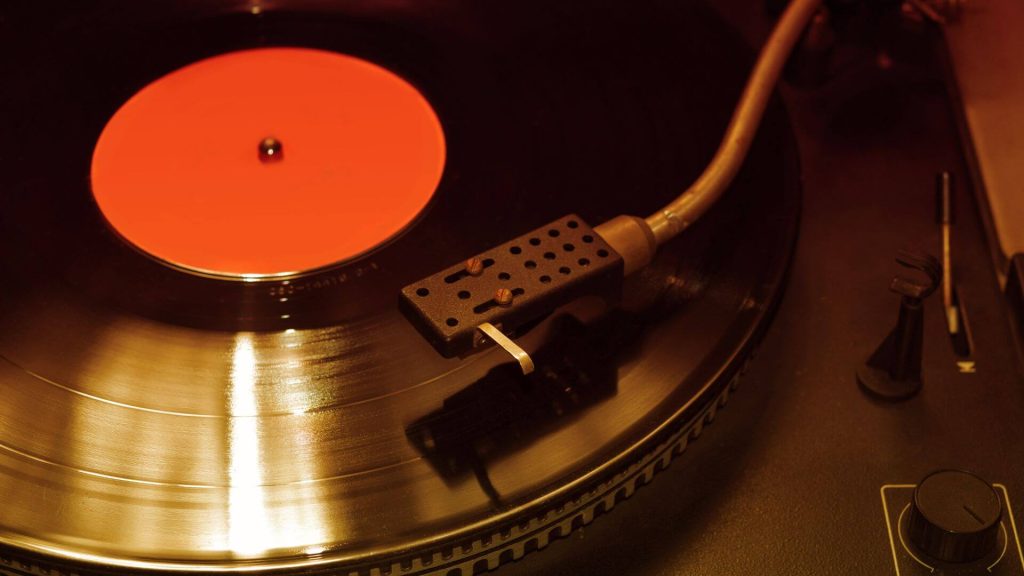
Step 2: Attach the Cartridge to the Headshell
There are a few steps that you need to get done before aligning the turntable cartridge because they can misalign the cartridge.
Start by attaching your new cartridge to the headshell and fixing it on the tonearm by connecting the different wires to their respective spots, preferably using needle pliers.

The process of installation will vary depending on the mounting system as well as the brand of the cartridge, so make sure that you check the instructions provided by the manufacturer and follow them all the way.
However, almost all standard cartridges will involve sliding the phono cartridge into place until the holes of the screws are lined properly so you can tighten them partially with a screwdriver.
Pro Tip: keep the stylus tip covered to protect it from damage at this point.
Step 3: Adjust the Turntable Counterweight to Optimize the Tracking Pressure
Another step that you should complete before the alignment is adjusting the turntable tracking pressure.
Different phono cartridges will have different tracking weight ranges along with a recommended one.
Adjust the counterweight to get the proper tracking pressure by spinning the dial knob at the end of the tonearm.
Step 4: Set the Alignment Protractor Properly on the Turntable
Now that everything is ready for alignment, start by placing the protractor on the turntable to establish a reliable reference.
Starting by punching or drilling a hole where you’re going to attach the protractor on the spindle. After that, align the protractor properly and once the hole is exactly over the spindle, push it all the way down so that the protractor rests level above the turntable.
Step 5: Place the Tonearm Above the First Alignment Grid
At that point, the cartridge and headshell should be attached to the tonearm with the screws not tightened all the way.
Lift the tonearm up and spin the turntable until the protractor is right under the tonearm. You might need to remove the tonearm lock to move it freely in some models before that step.
Remove the stylus cover from earlier and slowly lower the tonearm down so that the tip of the needle rests on the first alignment grid, which is usually marked (1) or (A).
Step 6: Adjust the Cartridge to Line It Up to the First Grid
Now that the needle is as close to the middle point on the first grid as possible, you’ll need to align the cartridge so that its sides are perfectly parallel to the lines of the grid.
Since the cartridge is only half-tightened, you can easily move it around horizontally to adjust how you line it up.
At that point, it’s also important to make sure that the stylus tip or needle sits perfectly perpendicular to the platter below. To adjust it, rotate the cartridge clockwise and anticlockwise from the sides to get the perfect alignment.
A good tip here is to always look at your alignment from exactly above the cartridge to make sure that you’re getting a perfect alignment.
Related: How To Tell If Turntable Cartridge Is Bad
Step 7: Move the Tonearm to the Second Alignment Grid
Now that you’ve adjusted the tangency of the turntable cartridge and the stylus, you need to make sure that it maintains proper alignment throughout the record.
To do that, gently lift the tonearm upwards and shift it to the side so that it is right above the second alignment grid on the protractor, which is usually marked as (2) or (B).
Avoid shifting the needle without pulling it up because it can heavily damage the stylus and shorten its life.
Once the cartridge is right above the second alignment grid, lower the stylus down gently to start adjusting it.
Step 8: Adjust the Cartridge to Line It Up to the Second Grid
Similar to the previous adjustment step, you’ll need to adjust the cartridge so that it sits properly above the grid.
This time in order to make sure that the other two sides of the cartridge are aligned, you’ll shift the cartridge back and forth very gently until all the points are lined up properly.
Keep in mind that the first two lines should stay properly aligned during the process. If you find them misaligned, go back to the first grid and repeat the previous steps.
Aligning the cartridge with the two grids can be a little tricky, but with a few trials, you should be able to do it properly.
Step 9: Tighten the Headshell Screws to Finalize
Now that everything is properly aligned exactly how it should be, you’ll need to tighten the screws of the cartridge to keep it lined up properly above the turntable.
After giving the stylus one last double check on the two grids, use an Allen (hex) key or a flathead screwdriver (depending on your model), to tighten the screws of the mounting system.
Take your time while tightening the screws and don’t apply excessive pressure to avoid offsetting the alignment of the cartridge as you go.
How Often Do You Have to Realign a Turntable Cartridge?
Ideally, turntable cartridge alignment is usually something that you only do once when you first install a new cartridge, so you’ll only need to realign the cartridge if you replace them with a new one, whether after wearing it down or upgrading it to a better one.
One thing you need to know about turntable cartridges is that they’re designed to last for decades if they’re properly maintained. However, the only part that you’ll need to replace in a cartridge is the stylus or the needle tip.
This part will usually wear out after 400 to 1,000 hours of playtime, depending on the construction and shape of the diamond, which translates to around 3 to 5 years of use depending on your use frequency.
In other words, you’ll need to realign your turntable cartridge once every 3 to 5 years of use, or if you decide to opt for an improved cartridge.