
When I was a rookie turntablist, I couldn’t wrap my head around how many settings and features I had to deal with just to set up my deck and get the sound right.
One of those was the anti-skate function. If you’re struggling with the same thing now, I’m here to help you tackle adjusting your workstation.
Today, I’ll be sharing a detailed guide on how to set anti-skating on a turntable.
How to Set Anti-Skating on a Turntable
Setting anti-skating on a turntable involves 5 steps: locating the anti-skate control, clearing any pre-calibration, checking the position of the tonearm, adjusting the VTF (Vertical Tracking Force), and tweaking the anti-skating value accordingly.
What’s the Ideal Anti-Skating Value?
When you play a record, there’s a force related to rotation and friction that causes the tonearm to get pulled in towards the center.
This “skating” of the tonearm can result in skipping and sound distortions. It can also lead to scratching and damaging the record.
To counteract the pulling force and prevent these drawbacks, an anti-skating feature is added to the turntable to keep the tonearm from gliding across the record.
Properly calibrated, anti-skating ensures that the stylus sits perfectly in the record’s groove to produce balanced sound through both left and right channels. Additionally, you get distortion-free dynamics and skip-free playbacks.
Not to mention, you’re protecting the integrity of your records and reducing irregular stylus wear.
How to Adjust Anti-Skating on Your Turntable
Now that you understand the difference that anti-skating can make in the audio quality of your playback and the condition of your records, I bet you’re eager to know how you should set this feature for the best results.
But first, you should ask yourself, do all tonearms need anti-skating adjustment?
You may be surprised to learn that the answer is no.
Yup — some tonearms don’t support this feature, even after all that talk about how important anti-skating can be in achieving a balanced sound and protecting your equipment.
However, this doesn’t mean that such turntables have something wrong. Their tonearms simply don’t require anti-skating.
A 12-inch tonearm coupled with a 2g track force or more, for example, doesn’t typically need anti-skate in many cases.
Here, if you were to measure the distortion of the L and R channels, you’ll probably find that the values are very close already.
That said, the vast majority of turntables have 9-inch tonearms, which do call for anti-skating.
Steps to Setting the Anti-Skate Feature on a Turntable
Here are the steps you should follow to properly set anti-skating on your turntable
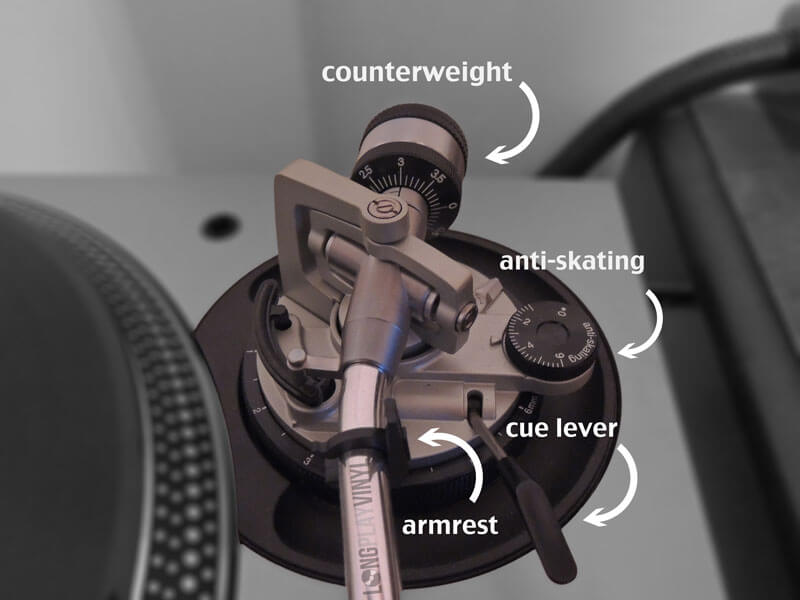
1. Locate the anti-skate control
First things first, you should find the control corresponding to the anti-skate function.
Usually, the anti-skating control on a turntable is a rotating knob labeled from 0 to 4 with multiple increments between each number and the next. Sometimes the increments are fewer so the numbers go all the way to 7.
In any case, the knob should have the words “anti-skate” or “anti-skating” labeled on the dial itself or next to it.
2. Clear the existing calibration
Once you locate the anti-skate control, there’s a good chance you’ll find it already turned and set to a certain number. This is either a random setting or the manufacturer’s default setting for the tonearm.
Whatever the number is, rotate the dial knob down all the way to 0. If it’s already at 0, don’t do anything.
3. Check that the tonearm is balanced
With the knob dialed down to 0, move on to check the position of the tonearm.
Your goal is to make sure the tonearm is balanced at a horizontal straight angle, not tipped upwards or downwards.
In other words, the tonearm should be just grazing the top of the platter’s surface, hovering right above it.
To achieve such a position, you need to tweak the tonearm and the counterweight simultaneously. Here’s how:
- Grab the headshell.
- While holding, release the tonearm’s locking clamp. The purpose of the clamp is to secure the tonearm in place, so by releasing it, you can freely move the tonearm.
- Releasing the clamp will cause the tonearm to rebound a bit, so take care.
- Slowly adjust the counterweight while keeping an eye on the position of the tonearm.
- Once the tonearm is balanced at a horizontal straight angle, stop touching the counterweight.
- Gently push the tonearm back to its resting spot and then lock the clamp again.
Keep in mind that the stylus is at risk of hitting something during this process. This can damage it significantly, so be sure to not let it happen.
Users Also Read: Why does my record player sound bad?
4. Adjust the VTF (Vertical Tracking Force)
Adjusting the VTF on your turntable is essential to properly setting the anti-skate.
Start by rotating the dial knob corresponding to the counterweight all the way down to 0. The movement of the knob shouldn’t affect the counterweight, so don’t forget to check if this is actually the case.
Next, take a look at your users’ manual and find the guidelines regarding VTF. The recommended value is what you should set the knob to.
Don’t “wing it” or use someone else’s settings unless they use the same exact turntable model you do. Even under the same brand, different models will have different VTF settings because the featured cartridges may vary.
5. Set the anti-skating
To set the anti-skate, do the following:
- Turn the anti-skate dial to the same value as the recommended VTF that you set in the previous step. This will put you within the general correct range.
- Play the record for a couple of minutes and listen for distortion (inner groove distortion is especially easy to pick up).
- The most notable distortion sounds like unpleasant hissing around “sh” and “s” letters. This is also known as sibilance.
- If you hear louder distortion on either the left or right channel, tweak the anti-stake value. You want the annoying sound to be as minimal as possible.
- Listen again for a few minutes at multiple points across your record. You’re looking for any variations at these points, whether in dynamics, tone, or soundstage.
- If you do find variations, tweak the anti-skate again until it’s cleared up or comes to a minimum.